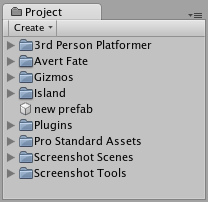
A Prefab is a type of asset -- a reusable GameObject stored in Project View. Prefabs can be inserted into any number of scenes, multiple times per scene. When you add a Prefab to a scene, you create an instance of it. All Prefab instances are linked to the original Prefab and are essentially clones of it. No matter how many instances exist in your project, when you make any changes to the Prefab you will see the change applied to all instances.
预设件是一种资源类型——存储在项目视图中的一种可重复使用的游戏对象。预设件可以多次放入到多个场景中。当你添加一个预设件到场景中,就创建了它的一个实例。所有的预设件实例链接到原始预设件,基本上是它的克隆。不管你的项目存在多少实例,当你对预设件进行任何更改,你将看到这些更改将应用于所有实例。(后面统称为预设)
Creating Prefabs 创建预设
In order to create a Prefab, you must make a new blank Prefab using the menu. This blank Prefab contains no GameObjects, and you cannot create an instance of it. Think of a new Prefab as an empty container, waiting to be filled with GameObject data.
为了创建一个预设,你必须使用菜单构造一个新的空白预设,这个空预设不包含游戏对象,你不能创建它的一个实例。想象一个新的预设为一个空的容器,等着用游戏对象数据来填充。

A new, empty Prefab. It cannot be instanced until you fill it with a GameObject.
一个新的、空的预设,它不能实例化直到你用一个游戏对象来填充它
To fill the Prefab, you use a GameObject that you've created in the scene.
要填充预设,你要使用一个场景中已经创建的游戏对象。
- Choose Assets->Create->Prefab from the menu bar and name your new Prefab.
从菜单选择Assets->Create->Prefab并为新预设命名。 - In Hierarchy View, select the GameObject you wish to make into a Prefab.
在层次视图中,选择你想使之成为预设的游戏对象。 - Drag & drop the GameObject from the Hierarchy onto the new Prefab in Project View.
在层次视图中拖动该对象到项目视图中的新预设上。
After you have performed these steps, the GameObject and all its children have been copied into the Prefab data. The Prefab can now be re-used in multiple instances. The original GameObject in the Hierarchy has now become an instance of the Prefab.
当你完成这些步骤之后,游戏对象和其所有子对象就已经复制到了预设的数据中。该预设现在可以在多个实例中重复使用。层次视图中的原始游戏对象已经成为了该预设的一个实例。
Prefab Instances 预设实例
To create a Prefab instance in the current scene, drag the Prefab from the Project View into the Scene or Hierarchy View. This instance is linked to the Prefab, as displayed by the blue text used for their name in the Hierarchy View.
要在当前场景创建预设的一个实例,从项目视图拖动预设到场景中或层次视图中。此实例是链接到该预设的,如下图在层次视图中使用蓝色文字显示的。

Three of these GameObjects are linked to Prefabs. One of them is not.
三个游戏对象是链接到预设的,另一个则不是
- If you have selected a Prefab instance, and want to make a change that affects all instances, you can click the Select button in the Inspector to select the source Prefab.
如果你选择了一个预设的实例,并希望做些改变以影响到所有实例,你可以在检视视图中单击Select按钮选择预设源 - Information about instantiating prefabs from scripts is in the Instantiating Prefabs page.
有关从脚本实例化预设的更多信息参考Instantiating Prefabs
Inheritance 继承
Inheritance means that whenever the source Prefab changes, those changes are applied to all linked GameObjects. For example, if you add a new script to a Prefab, all of the linked GameObjects will instantly contain the script as well. However, it is possible to change the properties of a single instance while keeping the link intact. Simply change any property of a prefab instance, and watch as the variable name becomes bold. The variable is now overridden. All overridden properties will not be affected by changes in the source Prefab.
继承是指当预设源发生变化,这些变化将应用于所有已链接的游戏对象。例如,如果添加一个新的脚本到预设,所有已链接的游戏对象都将立刻包含该脚本。但是,它有可能改变一个单独实例的属性,同时保持链接。改变任何一个预设实例的属性,可以看到变量名称变为粗体,现在该变量可以被重写,所有的重写属性不会影响预设源的变化。
This allows you to modify Prefab instances to make them unique from their source Prefabs without breaking the Prefab link.
这使你可以修改预设实例使它们变得独一无二,而不破坏它们与预设源之间的链接。

A linked GameObject with no overrides enabled.

A linked GameObject with several (bold) overrides enabled.
- If you want to update the source Prefab and all instances with the new overridden values, you can click the Apply button in the Inspector.
如果你想用新属性值覆盖更新预设源和所有实例,你可以在检视视图中点击Apply按钮。 - If you want to discard all overrides on a particular instance, you can click the Revert button.
如果你要放弃对特定实例的所有覆盖更新,您可以点击Revert按钮。
Breaking and Restoring Prefab Links 破坏和恢复预设链接
There are certain actions which will break the link between a single instance and its source prefab, but the link can always be restored. Actions that will break the link:
有些行为,将破坏单个实例及其预设源之间的链接,但链接总是可以恢复的。下面的行为将破坏链接:
- Adding or removing a Component 添加或删除一个组件
- Adding or removing a child GameObject 添加或删除一个子对象
These actions will prompt a warning/confirmation message about breaking the link. Confirming the action will break the link so changes to the source Prefab will no longer affect the broken instance. To restore the link, you can click either the Reconnect or Apply buttons in the Inspector of the instance.
这些行为将引起一个破坏链接的警告/确认消息。确认该行为将破坏链接,这样,更改预设源将不再影响已破坏了链接的实例。要恢复该链接,你可以在实例的检视视图中单击Reconnect或Apply按钮。
- Reconnect will discard all differences from the source Prefab.
Reconnect将丢弃与预设源的所有差别。 - Apply will copy all differences into the source Prefab (and therefore, all other Prefab instances)
Apply将复制所有差别到预设源中(包括所有其它预设实例)
Imported Prefabs 导入预设
When you place a mesh asset into your Assets folder, Unity automatically imports the file and generates something that looks similar to a Prefab out of the mesh. This is not actually a Prefab, it is simply the asset file itself. Instancing and working with assets introduces some limitations that are not present when working with normal Prefabs.
当你放置一个网格资源到你的资源文件夹中,Unity自动导入文件并生成一些类似于一个预制的网格。这实际上不是一个预设,它只是这个资源文件本身。在使用正常预设工作时,资源的实例化和使用将带来一些当前没有的限制。(什么意思)

Notice the asset icon is a bit different from the Prefab icons
The asset is instantiated in the scene as a GameObject, linked to the source asset instead of a normal Prefab. Components can be added and removed from this GameObject as normal. However, you cannot apply any changes to the asset itself since this would add data to the asset file itself! If you're creating something you want to re-use, you should make the asset instance into a Prefab following the steps listed above under "Creating Prefabs".
资源是作为一个游戏对象存在于场景中的实例,链接到源资源代替一个正常的预设。作为正常的游戏对象,组件可以被添加和删除。但是,你不能应用任何变动到这个资源本身,因为这样将给资源文件本身添加数据!如果你创建一些你想要重复使用的东西,你应该将资源实例制成一个预设,后面的步骤列出了前文"创建预设"的从属步骤。
- When you have selected an instance of an asset, the Apply button in the Inspector is replaced with an Edit button. Clicking this button will launch the editing application for your asset (e.g. Maya or Max).
当你选择了一个资源的实例,检视视图中的应用(Apply)按钮将被替换为一个编辑(Edit)按钮。点击此按钮将为你的资源启动编辑程序(如Maya或3DMAX)。
