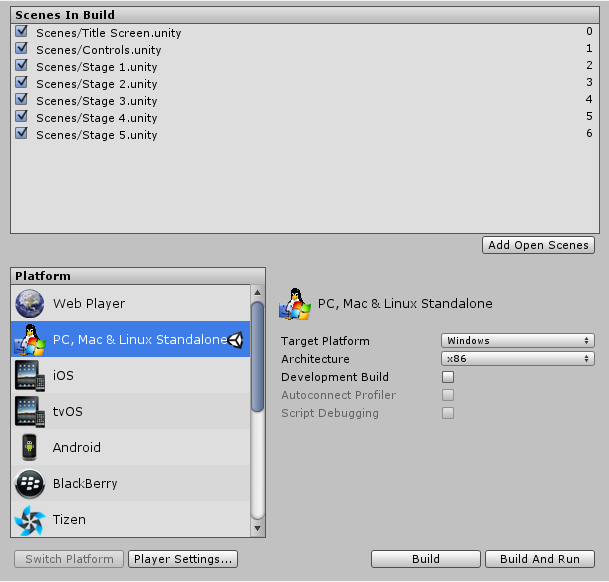
Build Settings
The Build Settings window allows you to choose your target platform, adjust settings for your build, and start the build process. To access the Build Settings window, select File > Build Settings… . Once you have specified your build settings, you can click Build to create your build, or click the Build And Run to create and run your build on the platform you have specified.

Scenes in Build
This part of the window shows you the scenes from your project that will be included in your build. If no scenes are shown then you can use the Add Current button to add the current scene to the build, or you can drag scene assets into this window from your project window. You can also untick scenes in this list to exclude them from the build without removing it from the list. If a scene is never needed in the build you can remove it from the list of scenes by pressing the delete key.
Scenes that are ticked and added to the Scenes in Build list will be included in the build. The list of scenes will be used to control the order the scenes are loaded. You can adjust the order of the scenes by dragging them up or down.
Platform List
The Platform area beneath the Scenes in Build area list all the platforms which are available to your Unity version. Some platforms may be greyed out to indicate they are not part of your version or invite you to download the platform specific build options. Selecting one of the platforms will control which platform will be built. If you change the target platform, you need to press the “Switch Platform” button to apply your change. This may take some time making the switch, because your assets may need to be re-imported in formats that match your target platform. The currently selected platform is indicated with a Unity icon to the right of the platform name.
The selected platform will show a list of options that can be adjusted for the build. Each platform may have different options. These options are listed below. Options that are common across many platforms are listed at the very bottom of this section under the “Generic items across builds” details.
PC, Mac & Linux Standalone
| Option | Purpose |
|---|---|
| Target Platform | |
| Windows | Build for Windows |
| Mac OS X | Build for Mac |
| Linux | Build for Linux |
| Architecture | x86 |
| x86 | 32-bit CPU |
| x86_64 | 64-bit CPU |
| Universal | All CPU devices |
| x86 + x86_64 (Universal) | All CPU devices for Linux |
| Headless Mode | Build game for server use and with no visual elements |
iOS
| Option | Purpose |
|---|---|
| Run in Xcode as | |
| Release | Shipping version |
| Debug | Testing version |
| Symlink Unity libraries | Reference to the Unity libraries instead of copying them into the XCode project. (Reduces the XCode project size.) |
Android
| Option | Purpose |
|---|---|
| Texture Compression | |
| Don’t override | |
| DXT Tegra) | |
| PVRTC (PowerVR) | |
| ATC (Adreno) | |
| ETC (default) | |
| ETC2 (GLES 3.0) | |
| ASTC | |
| Build System | |
| Internal (Default) | Generate the output package (APK) using the internal Unity build process, based on Android SDK utilities. |
| Gradle (New) | Generate the output package (APK) using the Gradle build system. Supports direct Build and Run and exporting the project to a directory. This is the preferred option for exporting a project, as Gradle is the native format for Android Studio. |
| ADT (Legacy) | Export the project in ADT (eclipse) format. The output package (APK) can be built in eclipse or Android Studio. This project type is no longer supported by Google and is considered obsolete. |
Tizen
Build Settings for Tizen use the generic settings shown later on this page.
WebGL (Preview)
| Option | Purpose |
|---|---|
| Optimization Level | Active when Development Build is selected |
| Slow (fast builds) | |
| Fast | |
| Fastest (very slow builds) |
Samsumg TV
Build Settings for Samsumg TV use the generic settings shown later on this page.
Windows Store
| Option | Purpose |
|---|---|
| TBD | TBD |
Windows Phone 8
| Option | Purpose |
|---|---|
| TBD | TBD |
Other platforms
Console platforms and devices which require a Unity license will be documented in the Platform Specific section of the User Guide.
Generic items across builds
| Option | Purpose |
|---|---|
| Development Build | Allow the developer to test and work out how the build is coming along. |
| Autoconnect Profiler | When the Development Build option is selected allow the profiler to connect to the build. |
| Script Debugging | When the Development Build option is selected allow the script code to be debugged. Not available on WebGL. |
• 2017–05–16 Page amended with no editorial review - Leave page feedback