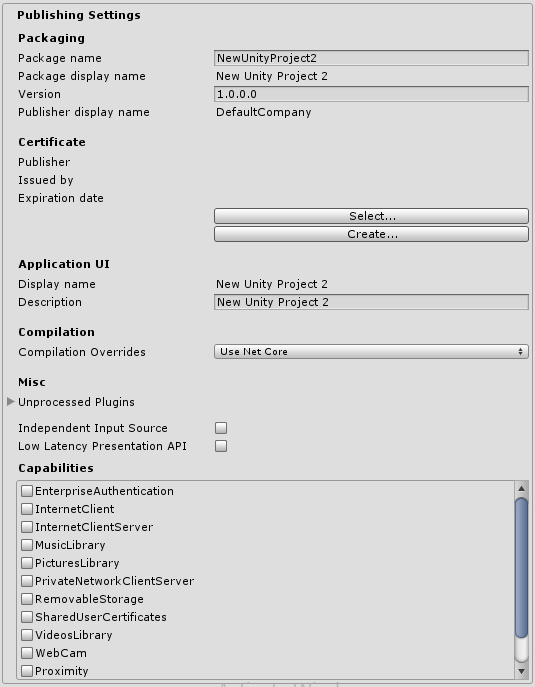
WSA Player Settings
This page details the Player Settings specific to Windows Store Apps. A description of the general Player Settings can be found here.

Most of these settings are transferred to Package.appxmanifest when creating Visual Studio solution for the first time.
Note: If you build your project on top of the existing one, Unity won’t overwrite Package.appxmanifest file if it’s already present, that means if you change something in Player Settings be sure to check Package.appxmanifest, if you want Package.appxmanifest to be regenerated, simply delete it, and rebuild your project from Unity.
To read more about App package manifest, please visit http://msdn.microsoft.com/en-us/library/windows/apps/br211474.aspx.
Settings from Packaging, Application UI, Tile, Splash screen, Capabilities directly transfer to settings in Package.appxmanifest file.
Supported orientations from Player Settings are also populated to the manifest (Package.appxmanifest file in Visual Studio solution). On Windows 8.1 (both Store and Phone) no further actions are taken, Unity will start in the orientation that is currently present, so if you change your application’s orientation in code before initializing Unity, it will start in that orientation. On Windows 10 Universal Apps Unity will reset orientation to the one you used in Player Settings, regardless what you specify in the manifest. This is because Windows itself ignores those settings on desktop and tablet computers. Note, that you can always change supported orientations using Unity scripting API.
Certificate
Every Windows Store App needs a certificate which identifies a developer, Unity will create a default certificate, if you won’t provide your own.
Compilation
As you know, Unity uses Mono when compiling script files, and you can use the API located in .NET 3.5. Compilation Overrides allows you to use .NET for Windows Store Apps (also known as .NET Core) in your C# files, the API is available here.
When Compilation Overrides is set to:
- None - C# files are compiled using Mono compiler.
- Use .Net Core - C# files are compiled using Microsoft compiler and .NET Core, you can use Windows Runtime API, but classes implemented in C# files aren’t accessible from the JS language. Note: when using API from Windows Runtime, it’s advisable to wrap the code with NETFX_CORE define, because the API is only avaible when building to Windows Store Apps, and it’s not available in Unity Editor.
- Use .Net Core Partially - C# files not located in Plugins, Standard Assets, Pro Standard Assets folders are compiled using Microsoft compiler and .NET Core, all other C# files are compiled using Mono compiler. The advantage is that classes implemented in C# are accessible from the JS language. Note: You won’t be able to test .NET Core API in Unity Editor, because it doesn’t have access to .NET Core, so you’ll be able to test the API only when running Windows Store App.
Note: You cannot use .NET Core API in JS scripts.
Here’s a simple example how to use .NET Core API in scripts.
string GetTemporaryFolder()
{
#if NETFX_CORE
    return Windows.Storage.ApplicationData.Current.TemporaryFolder.Path;
#else
    return "LocalFolder";
#endif
}
Misc
Unprocessed Plugins contains a list of plugins which are ignored by Unity’s preprocessing tools (like SerializationWeaver, AssemblyPreprocessor, rrw), usually you don’t need to modify this list, unless you’re getting an error that Unity’s failed to preprocess your plugin.
What will happen if you’ll add a plugin to this list?
Unity won’t inject additional IL code into your assembly used for serialization purposes, but if you’re plugin isn’t referencing UnityEngine.dll, that’s totally fine, because Unity won’t serialize any data from your plugin.
Independent Input Source
Let’s you enable an option for independent input source, you can read more here. Basically this makes your input more responsive, and usually you want this option to be enabled.
Low Latency Presentation API Let’s you enable Low Latency Presentation API, basically this create D3D11 swapchain with DXGI_SWAP_CHAIN_FLAG_FRAME_LATENCY_WAITABLE_OBJECT flag, read more here and should increase input responsiveness. This option is disabled by default because on hardware with older GPU drivers, this option makes game laggy, if you enable this option - be sure to profile your game if the performance is still acceptable.
Capabilities
These options are directly copied to Package.appxmanifest.
Note: If you’re build your game on top of previous package, Package.appxmanifest won’t be overwritten.